Main Page: Difference between revisions
No edit summary |
No edit summary |
||
| (8 intermediate revisions by the same user not shown) | |||
| Line 44: | Line 44: | ||
# On the right hand panel, under 'Cloud', select 'Networking'. | # On the right hand panel, under 'Cloud', select 'Networking'. | ||
# The top right hand corner, select 'Create Network'. [[File:Network1.png|border|800px]] | # The top right hand corner, select 'Create Network'. | ||
#*[[File:Network1.png|border|800px]] | |||
# Choose which region you'd like to create your virtual network in. For more information about regions, please review our [[Regions]] article. | # Choose which region you'd like to create your virtual network in. For more information about regions, please review our [[Regions]] article. | ||
# Toggle the option for 'Subnet' to 'On'. | # Toggle the option for 'Subnet' to 'On'. | ||
| Line 52: | Line 53: | ||
# By default, your private network will use the first address in the subnet as the default gateway. If you'd like to specify a custom gateway, you can toggle the 'Custom Gateway IP' option and specify whichever address you'd like. Likewise, you can narrow the DHCP allocation range or specify additional static routes on this screen. | # By default, your private network will use the first address in the subnet as the default gateway. If you'd like to specify a custom gateway, you can toggle the 'Custom Gateway IP' option and specify whichever address you'd like. Likewise, you can narrow the DHCP allocation range or specify additional static routes on this screen. | ||
# Once you've finished, add a name for this private network and select 'Create Network'. | # Once you've finished, add a name for this private network and select 'Create Network'. | ||
[[File:Network2.png|border|800px]] | #*[[File:Network2.png|border|800px]] | ||
In order to link your private virtual network to the internet, please review our [[Networking]] article. | In order to link your private virtual network to the internet, please review our [[Networking]] article. | ||
* '''Create a Security Group''' | |||
Each virtual network interface in the DataTenant Public Cloud has a set of ACLs applied to it by default that act as a sort of mini-firewall. These ACL sets are called 'security groups', and the default security group only allows outbound network traffic, while denying all inbound network traffic. So, if you want to be able to control your virtual machine through SSH, RDP, VNC, etc. or allow any other inbound communication with your virtual machine, you'll need to create a new security group for this purpose. | |||
# On the right hand panel, under 'Cloud', select 'Networking'. | |||
# The top menu, select 'Security Groups'. At the bottom of that menu, choose 'Create Security Group'. | |||
#*[[File:SG1.png|border|600px]] | |||
# Select which region you'd like this security group to be used in. For more information about regions, please review our [[Regions]] article. Enter a name for your security group and select 'Create Security Group'. | |||
#*[[File:SG2.png|border|600px]] | |||
# Select your newly created security group from the list. | |||
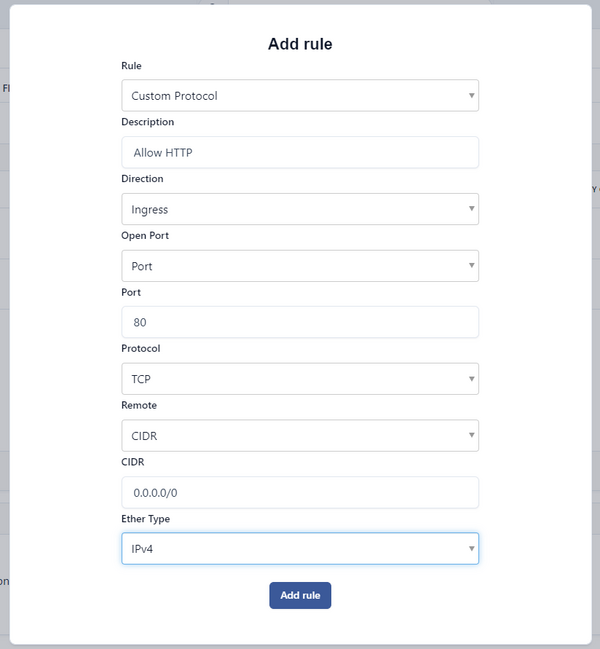
# By default, all egress traffic will be allowed. To create new rules, select 'Add rule'. In the box that appears, you can specify what sort of traffic you want to allow. Anything that isn't explicitly allowed is denied. | |||
## In the Rule menu, you can either select 'All Protocols' to allow TCP, UDP, and ICMP, or you can choose 'Custom Protocol' to choose from one of these options. | |||
## In the description field, you can optionally enter a brief description of what this rule does. | |||
## In the Open Port menu, you select whether you'd like to allow traffic over a single port, a range of ports, or all ports. If you select Port or Port Range, you can either the specific port(s) in the field that appears. | |||
## In the Remote menu, you can choose whether you'd like this rule to be applicable only to a specific group of endpoints or all endpoints. If you choose 'CIDR', you can enter a network subnet in the field that appears. This rule will only apply to endpoints coming from that subnet. To allow all traffic from all sources, enter 0.0.0.0/0. If you choose 'Security Group', you can select a different security group in your project, and this rule will only apply to interfaces in that security group. | |||
## In the EtherType menu, you can select IPv4 or IPv6 for this rule. | |||
#*[[File:SG3.png|border|600px]] | |||
# When you are done, select 'Add Rule'. You can now apply this rule to any virtual interface in your project and the rule will be enforced. | |||
| Line 61: | Line 82: | ||
If you are going to create new Linux virtual machines, you'll want to create a keypair so you can securely access your virtual machines after their creation. | If you are going to create new Linux virtual machines, you'll want to create a keypair so you can securely access your virtual machines after their creation. | ||
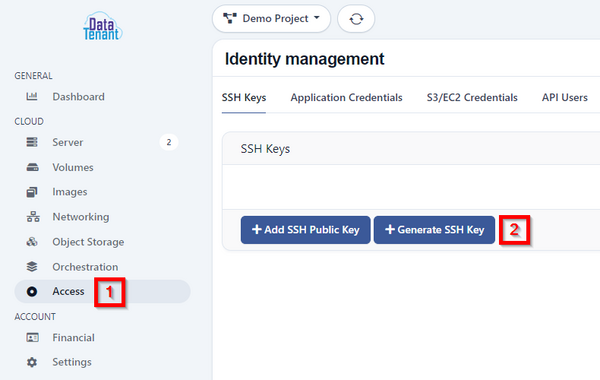
# To do this, navigate to 'Access' and select 'Generate SSH Key'. | # To do this, navigate to 'Access' and select 'Generate SSH Key'. | ||
[[File:SSH1.png|border|600px]] | #*[[File:SSH1.png|border|600px]] | ||
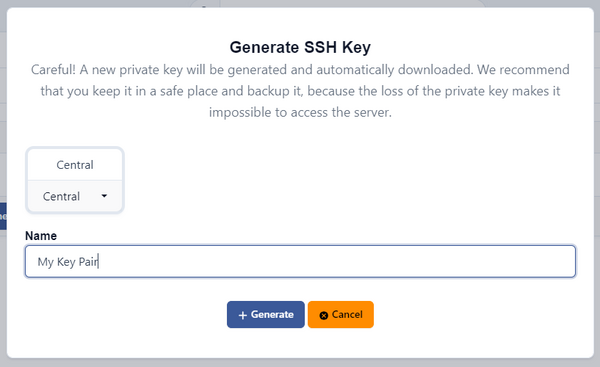
# Select which region you'd like the SSH keypair to be used in. For more information about regions, please review our [[Regions]] article. Give your Key Pair a name and select 'Generate'. | # Select which region you'd like the SSH keypair to be used in. For more information about regions, please review our [[Regions]] article. Give your Key Pair a name and select 'Generate'. | ||
[[File:SSH2.png|border|600px]] | #*[[File:SSH2.png|border|600px]] | ||
# A window will appear asking you to save your private key file. Save it somewhere secure, as DataTenant does not have a way to regenerate or access your private key! | # A window will appear asking you to save your private key file. Save it somewhere secure, as DataTenant does not have a way to regenerate or access your private key! | ||
| Line 70: | Line 91: | ||
* '''Create a Virtual Machine''' | * '''Create a Virtual Machine''' | ||
Now that you've created a private network and a keypair (if you're intending to deploy Linux VMs), you're ready to create your first virtual machine. | |||
# On the right hand panel, under 'Cloud', select 'Server'. | |||
# The top right hand corner, select 'Create a Cloud Server'. | |||
# Choose which region you'd like to create your virtual machine in. For more information about regions, please review our [[Regions]] article. | |||
# A list of images will be available for you to select from in the 'Images' menu. Select one, or if you're wanting to create and select a custom image, please review our [[Images]] article. | |||
# Performance tiers and hardware specifications are available to choose from in the 'Hardware' menu. Select the one that corresponds to what you'd like for your virtual machine. If you're unsure about the different performance tiers, please review our [[Compute Tiers]] article. | |||
# A system disk/root volume will automatically be populated in the 'Volumes' menu. You can select a performance tier from the 'Type' menu', and input whatever size you'd like in the 'Size' field. For more information about disk performance tiers, please review our [[Storage Tiers]] article. You can also add additional volumes here, or you can opt to add them at any later time. | |||
# In the Network menu, de-select the 'Public Network' option and select the 'Private Network' option. | |||
## A 'Private Network' menu will appear. Choose from your available private networks. If there are no networks available to choose from, ensure you are creating your virtual machine in the correct region. You can also select 'Create Network' to create a virtual private network from here. | |||
# If you are creating a Linux virtual machine, select one of your available keypairs in the Authentication menu. This will inject your public key into the Linux VM during creation. If you are creating a non-Linux VM, simply select 'No SSH Key'. | |||
## If there are no keypairs available to choose from, ensure your keypair was created in the same region as the VM you are trying to create. | |||
# You can skip the 'Cloud config' menu unless you have unique customization needs. You can read more about those in our [[Cloud configs]] article. | |||
# If you created specific security group(s) earlier, select 'Add Security Group' in the 'Security Groups' menu and choose the one that you'd like to be applied to this server. If you don't choose a security group, the default security group will be applied, which will allow all outbound traffic but deny all inbound traffic. | |||
# Finally, give your server a name and select 'Create Server'. Your server will be renamed in the guest OS to match whatever name you provide here. Once you click 'Create Server', you will be redirected back to the Server menu, where it will take a few minutes for your virtual server to fully provision. | |||
Latest revision as of 19:23, 9 October 2024
DataTenant Knowledgebase
This repository of information should help you with any technical issues you have when using the DataTenant Cloud. Please check out our 'Getting Started' section below to find the most commonly read articles.
Common Topics
Below are some shortcuts to some of the topics that are commonly inquired about.
If you're just looking to get started, please watch this Getting Started tutorial video. Or, you can read through the steps listed below.
Getting Started
- Sign in to DataTenant PubCloud
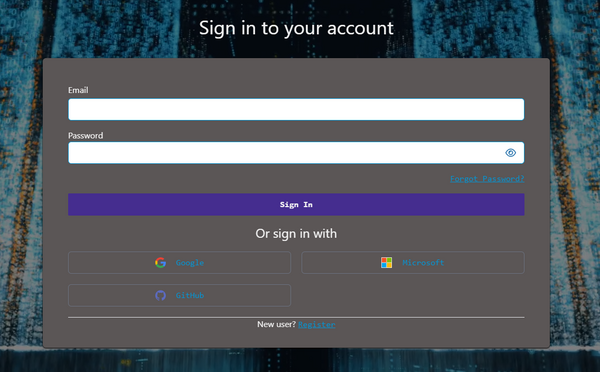
Navigate to DataTenant PubCloud and login. You can select 'Register' to create an account, which will prompt you to use an authenticator app like Microsoft Authenticator or FreeOTP to register an OTP code for 2FA purposes. Or, you simply login using your personal Google, Microsoft, or GitHub account.
- Create a Project
A project is a logical assortment of virtual machines, virtual networks, virtual volumes, SSH keypairs, security groups, object storage containers, and more. Each project you create will exist simultaneously in all compute regions. Once you've created your project, it will need to be activated before you can create virtual resources.
NOTE: If you are a business customer, and would like a free trial, please contact trials@datatenant.com
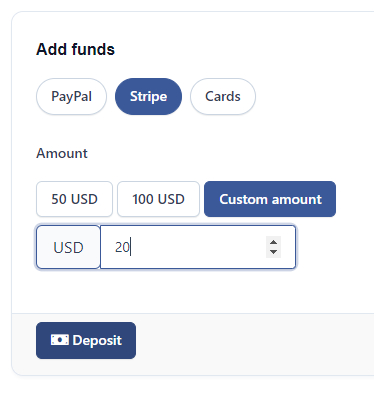
In order to activate an account, you must deposit at least twenty dollars, which will become available as a credit that you can apply to any future balances. This can be done via several payment methods, including: credit/debit card, Amazon Pay (available through Stripe), CashApp (available through Stripe), and PayPal. Once your payment is completed, you will see your balance updated to reflect your deposit, and your project will become active.
To learn more about billing and payments, please review our Billing article.
- Create a Network
Before creating a virtual machine, you'll want to create at least one private virtual network.
- On the right hand panel, under 'Cloud', select 'Networking'.
- The top right hand corner, select 'Create Network'.
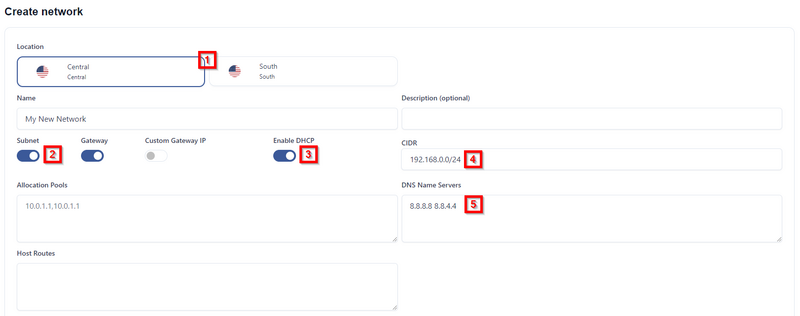
- Choose which region you'd like to create your virtual network in. For more information about regions, please review our Regions article.
- Toggle the option for 'Subnet' to 'On'.
- Toggle the option for 'DHCP' to 'On'.
- Define your subnet in the CIDR field. This can be any private IP range, like 192.168.0.0/24 or 10.0.1.0/24.
- Specify what DNS servers you'd like to be presented to devices that receive DHCP addresses from this network.
- By default, your private network will use the first address in the subnet as the default gateway. If you'd like to specify a custom gateway, you can toggle the 'Custom Gateway IP' option and specify whichever address you'd like. Likewise, you can narrow the DHCP allocation range or specify additional static routes on this screen.
- Once you've finished, add a name for this private network and select 'Create Network'.
In order to link your private virtual network to the internet, please review our Networking article.
- Create a Security Group
Each virtual network interface in the DataTenant Public Cloud has a set of ACLs applied to it by default that act as a sort of mini-firewall. These ACL sets are called 'security groups', and the default security group only allows outbound network traffic, while denying all inbound network traffic. So, if you want to be able to control your virtual machine through SSH, RDP, VNC, etc. or allow any other inbound communication with your virtual machine, you'll need to create a new security group for this purpose.
- On the right hand panel, under 'Cloud', select 'Networking'.
- The top menu, select 'Security Groups'. At the bottom of that menu, choose 'Create Security Group'.
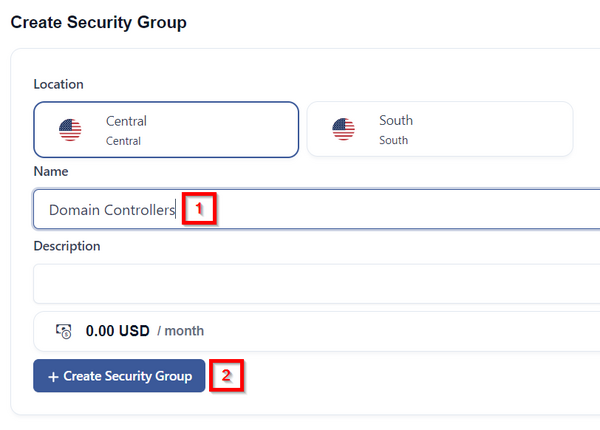
- Select which region you'd like this security group to be used in. For more information about regions, please review our Regions article. Enter a name for your security group and select 'Create Security Group'.
- Select your newly created security group from the list.
- By default, all egress traffic will be allowed. To create new rules, select 'Add rule'. In the box that appears, you can specify what sort of traffic you want to allow. Anything that isn't explicitly allowed is denied.
- In the Rule menu, you can either select 'All Protocols' to allow TCP, UDP, and ICMP, or you can choose 'Custom Protocol' to choose from one of these options.
- In the description field, you can optionally enter a brief description of what this rule does.
- In the Open Port menu, you select whether you'd like to allow traffic over a single port, a range of ports, or all ports. If you select Port or Port Range, you can either the specific port(s) in the field that appears.
- In the Remote menu, you can choose whether you'd like this rule to be applicable only to a specific group of endpoints or all endpoints. If you choose 'CIDR', you can enter a network subnet in the field that appears. This rule will only apply to endpoints coming from that subnet. To allow all traffic from all sources, enter 0.0.0.0/0. If you choose 'Security Group', you can select a different security group in your project, and this rule will only apply to interfaces in that security group.
- In the EtherType menu, you can select IPv4 or IPv6 for this rule.
- When you are done, select 'Add Rule'. You can now apply this rule to any virtual interface in your project and the rule will be enforced.
- Create a Keypair (Linux Only)
If you are going to create new Linux virtual machines, you'll want to create a keypair so you can securely access your virtual machines after their creation.
- To do this, navigate to 'Access' and select 'Generate SSH Key'.
- Select which region you'd like the SSH keypair to be used in. For more information about regions, please review our Regions article. Give your Key Pair a name and select 'Generate'.
- A window will appear asking you to save your private key file. Save it somewhere secure, as DataTenant does not have a way to regenerate or access your private key!
Once completed, your public key will be saved and available to inject into your Linux virtual machines during creation. You can also create/import your own keypairs from this screen as well. Please review our Keypairs article to learn more.
- Create a Virtual Machine
Now that you've created a private network and a keypair (if you're intending to deploy Linux VMs), you're ready to create your first virtual machine.
- On the right hand panel, under 'Cloud', select 'Server'.
- The top right hand corner, select 'Create a Cloud Server'.
- Choose which region you'd like to create your virtual machine in. For more information about regions, please review our Regions article.
- A list of images will be available for you to select from in the 'Images' menu. Select one, or if you're wanting to create and select a custom image, please review our Images article.
- Performance tiers and hardware specifications are available to choose from in the 'Hardware' menu. Select the one that corresponds to what you'd like for your virtual machine. If you're unsure about the different performance tiers, please review our Compute Tiers article.
- A system disk/root volume will automatically be populated in the 'Volumes' menu. You can select a performance tier from the 'Type' menu', and input whatever size you'd like in the 'Size' field. For more information about disk performance tiers, please review our Storage Tiers article. You can also add additional volumes here, or you can opt to add them at any later time.
- In the Network menu, de-select the 'Public Network' option and select the 'Private Network' option.
- A 'Private Network' menu will appear. Choose from your available private networks. If there are no networks available to choose from, ensure you are creating your virtual machine in the correct region. You can also select 'Create Network' to create a virtual private network from here.
- If you are creating a Linux virtual machine, select one of your available keypairs in the Authentication menu. This will inject your public key into the Linux VM during creation. If you are creating a non-Linux VM, simply select 'No SSH Key'.
- If there are no keypairs available to choose from, ensure your keypair was created in the same region as the VM you are trying to create.
- You can skip the 'Cloud config' menu unless you have unique customization needs. You can read more about those in our Cloud configs article.
- If you created specific security group(s) earlier, select 'Add Security Group' in the 'Security Groups' menu and choose the one that you'd like to be applied to this server. If you don't choose a security group, the default security group will be applied, which will allow all outbound traffic but deny all inbound traffic.
- Finally, give your server a name and select 'Create Server'. Your server will be renamed in the guest OS to match whatever name you provide here. Once you click 'Create Server', you will be redirected back to the Server menu, where it will take a few minutes for your virtual server to fully provision.
