Main Page: Difference between revisions
No edit summary |
No edit summary |
||
| Line 34: | Line 34: | ||
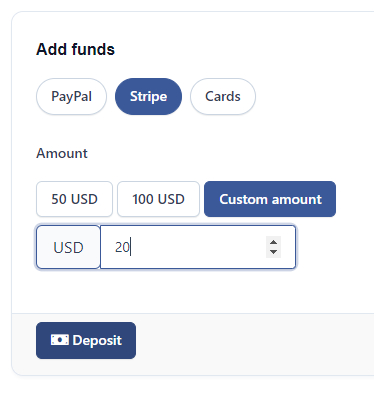
In order to activate an account, you must deposit at least twenty dollars, which will become available as a credit that you can apply to any future balances. This can be done via several payment methods, including: credit/debit card, Amazon Pay (available through Stripe), CashApp (available through Stripe), and PayPal. Once your payment is completed, you will see your balance updated to reflect your deposit, and your project will become active. | In order to activate an account, you must deposit at least twenty dollars, which will become available as a credit that you can apply to any future balances. This can be done via several payment methods, including: credit/debit card, Amazon Pay (available through Stripe), CashApp (available through Stripe), and PayPal. Once your payment is completed, you will see your balance updated to reflect your deposit, and your project will become active. | ||
[[File:AddFunds.png|border| | [[File:AddFunds.png|border|400px]] | ||
To learn more about billing and payments, please review our [[Billing]] article. | To learn more about billing and payments, please review our [[Billing]] article. | ||
| Line 45: | Line 45: | ||
# On the right hand panel, under 'Cloud', select 'Networking'. | # On the right hand panel, under 'Cloud', select 'Networking'. | ||
# The top right hand corner, select 'Create Network'. | # The top right hand corner, select 'Create Network'. | ||
[[File:Network1.png|border| | [[File:Network1.png|border|800px]] | ||
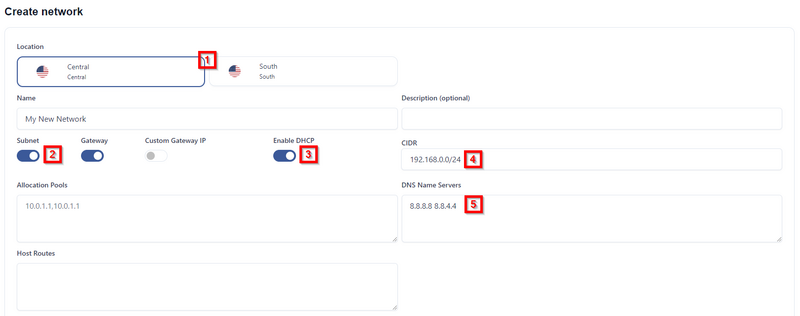
# Choose which region you'd like to create your virtual network in. For more information about regions, please review our [[Regions]] article. | # Choose which region you'd like to create your virtual network in. For more information about regions, please review our [[Regions]] article. | ||
# Toggle the option for 'Subnet' to 'On'. | # Toggle the option for 'Subnet' to 'On'. | ||
| Line 53: | Line 53: | ||
# By default, your private network will use the first address in the subnet as the default gateway. If you'd like to specify a custom gateway, you can toggle the 'Custom Gateway IP' option and specify whichever address you'd like. Likewise, you can narrow the DHCP allocation range or specify additional static routes on this screen. | # By default, your private network will use the first address in the subnet as the default gateway. If you'd like to specify a custom gateway, you can toggle the 'Custom Gateway IP' option and specify whichever address you'd like. Likewise, you can narrow the DHCP allocation range or specify additional static routes on this screen. | ||
# Once you've finished, add a name for this private network and select 'Create Network'. | # Once you've finished, add a name for this private network and select 'Create Network'. | ||
[[File:Network2.png|border| | [[File:Network2.png|border|800px]] | ||
Revision as of 20:13, 7 October 2024
DataTenant Knowledgebase
This repository of information should help you with any technical issues you have when using the DataTenant Cloud. Please check out our 'Getting Started' section below to find the most commonly read articles.
Common Topics
Below are some shortcuts to some of the topics that are commonly inquired about.
If you're just looking to get started, please watch this Getting Started tutorial video. Or, you can read through the steps listed below.
Getting Started
- Sign in to DataTenant PubCloud
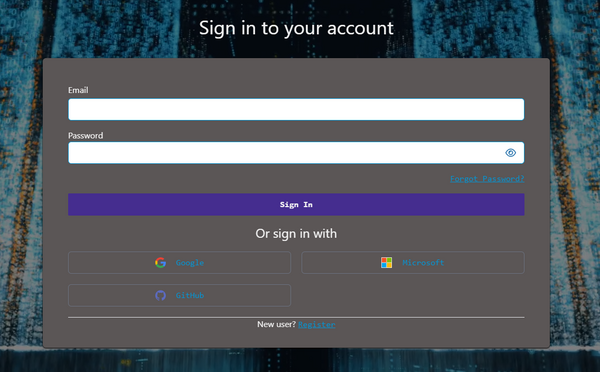
Navigate to DataTenant PubCloud and login. You can select 'Register' to create an account, which will prompt you to use an authenticator app like Microsoft Authenticator or FreeOTP to register an OTP code for 2FA purposes. Or, you simply login using your personal Google, Microsoft, or GitHub account.
- Create a Project
A project is a logical assortment of virtual machines, virtual networks, virtual volumes, SSH keypairs, security groups, object storage containers, and more. Each project you create will exist simultaneously in all compute regions. Once you've created your project, it will need to be activated before you can create virtual resources.
NOTE: If you are a business customer, and would like a free trial, please contact trials@datatenant.com
In order to activate an account, you must deposit at least twenty dollars, which will become available as a credit that you can apply to any future balances. This can be done via several payment methods, including: credit/debit card, Amazon Pay (available through Stripe), CashApp (available through Stripe), and PayPal. Once your payment is completed, you will see your balance updated to reflect your deposit, and your project will become active.
To learn more about billing and payments, please review our Billing article.
- Create a Network
Before creating a virtual machine, you'll want to create at least one private virtual network.
- On the right hand panel, under 'Cloud', select 'Networking'.
- The top right hand corner, select 'Create Network'.
- Choose which region you'd like to create your virtual network in. For more information about regions, please review our Regions article.
- Toggle the option for 'Subnet' to 'On'.
- Toggle the option for 'DHCP' to 'On'.
- Define your subnet in the CIDR field. This can be any private IP range, like 192.168.0.0/24 or 10.0.1.0/24.
- Specify what DNS servers you'd like to be presented to devices that receive DHCP addresses from this network.
- By default, your private network will use the first address in the subnet as the default gateway. If you'd like to specify a custom gateway, you can toggle the 'Custom Gateway IP' option and specify whichever address you'd like. Likewise, you can narrow the DHCP allocation range or specify additional static routes on this screen.
- Once you've finished, add a name for this private network and select 'Create Network'.


