Create a volume (Advanced Console): Difference between revisions
No edit summary |
No edit summary |
||
| Line 15: | Line 15: | ||
[[File:Cloud_Volume1.png|border| | [[File:Cloud_Volume1.png|border|600px]] | ||
| Line 24: | Line 24: | ||
[[File:Cloud_Volume2.png|border| | [[File:Cloud_Volume2.png|border|600px]] | ||
Your new volume will now provision. This process can take anywhere from a few seconds (for a blank volume) to up to several minutes (for a large OS, like a Windows Server OS). Once the volume shows as 'Available', you'll be free to use the volume as a boot source for a new VM or to attach it to an existing VM. For more information on how to use your new volume, review the [[Creating a virtual machine]] article or the [[Attaching a volume to an existing virtual machine]] article. | Your new volume will now provision. This process can take anywhere from a few seconds (for a blank volume) to up to several minutes (for a large OS, like a Windows Server OS). Once the volume shows as 'Available', you'll be free to use the volume as a boot source for a new VM or to attach it to an existing VM. For more information on how to use your new volume, review the [[Creating a virtual machine]] article or the [[Attaching a volume to an existing virtual machine]] article. | ||
Revision as of 15:47, 16 May 2024
This article will help you create a new block storage volume.
Volumes are the 'storage disks' in the DataTenant Cloud, like VMDKs in VMWare ESX or VHDs in Microsoft Hyper-V. If you already have a virtual machine running, you can create blank volumes and attach them to your VM for storage using this article. Otherwise, you can also create volumes from an image, which will contain the operating system you selected for a new VM.
Create a volume
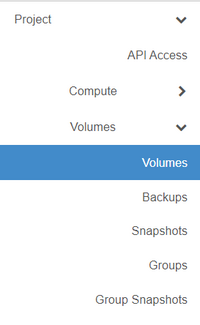
Login to the DataTenant Cloud. Navigate to the Project, Volumes, Volumes menu.
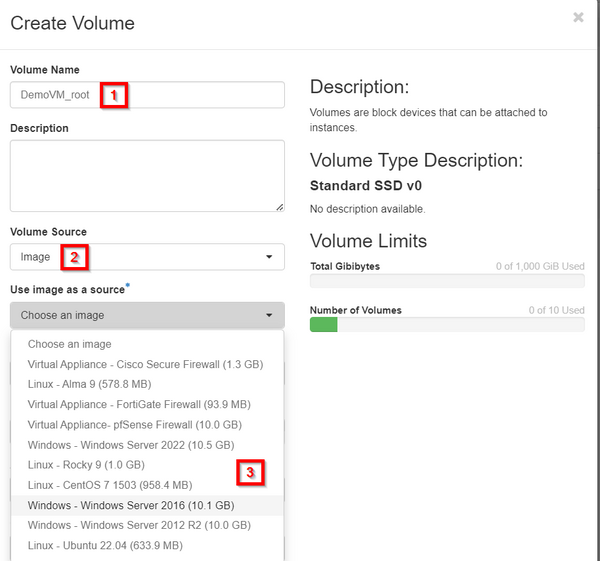
Click 'Create Volume'. Enter a unique volume name. For example, a volume for a new Windows web server might be called 'WinWeb01_C'.
If you want to create a blank volume (for additional storage on a VM, for example), leave the 'Volume Source' dropdown set to the default. Otherwise, select 'Image' in the dropdown and then select the OS you want to clone from the resulting 'Use image as a source' dropdown.
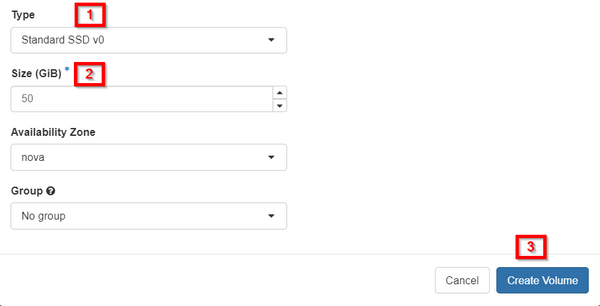
In the 'Type' dropdown, you can choose one of four storage tiers: Standard HDD, Ultra HDD, Standard SSD, and Ultra SSD. If you need help deciding which tier is best for your needs, please review the Understanding Storage Tiers article.
In the 'Size' field, enter the size you'd like your new volume to be. When you're done, click 'Create Volume'.
Your new volume will now provision. This process can take anywhere from a few seconds (for a blank volume) to up to several minutes (for a large OS, like a Windows Server OS). Once the volume shows as 'Available', you'll be free to use the volume as a boot source for a new VM or to attach it to an existing VM. For more information on how to use your new volume, review the Creating a virtual machine article or the Attaching a volume to an existing virtual machine article.


